Table of Contents
- Introduction
- Chapter 1: HubSpot Onboarding: Our Process & What It Takes
- Chapter 2: A HubSpot File-Naming System To Keep You Perfectly Organized
- Chapter 3: Our 5 Most Helpful (& Most Used) HubSpot Integrations
- Chapter 4: Avoid A Marketing Snafu By Conducting A HubSpot Audit
- Chapter 5: How To Use HubSpot Lists For Deeper Analytics
- Chapter 6: How To Manage Multiple Websites In HubSpot (Without Going Crazy)
- Chapter 7: HubSpot Hack: How To Create Alternate Form Content For Certain Visitors
- Chapter 8: SEO & HubSpot Hack: How To Find, Attract, & Categorize Leads By Vertical [Video]
- Conclusion
We started using HubSpot more than five years ago, and truth be told, we really didn’t want to like it. (More on that here.) But now it’s safe to say, we love it. We use HubSpot with almost all our clients and for our own company, and we’re in it constantly. Every. Single. Day. So naturally, we’ve identified a ton of things that have made our lives easier—and will do the same for you. Whether you’re just getting started or you’ve been an avid user for years, this ultimate guide is packed with HubSpot marketing tips, hacks, and tutorials that will take your HubSpot-user experience to a whole new level.
(Warning: Remember that we have FIVE YEARS of HubSpot experience, so this article is a whopper. To get the most out of it, we recommend using the table of contents on the left to jump to the areas where you could use the most help.)Chapter 1: HubSpot Onboarding: Our Process & What It Takes

If you’ve just subscribed to HubSpot’s software or are thinking of subscribing, you may be interested in knowing what goes into getting set up with HubSpot, or as we like to call it, HubSpot onboarding.
A lot of effort goes into making HubSpot work well, and the onboarding process is no exception. To help you get settled quickly and easily, check out the steps we follow to complete HubSpot onboarding for our clients. Instructional articles from HubSpot are included at the end of each step, and a couple of our own resources are sprinkled throughout.
HubSpot Onboarding: Our Step-By-Step Process
1. Add HubSpot’s tracking code to your website.
If any portion of your website is not hosted on HubSpot—even if it’s just a couple pages—you need to install HubSpot’s tracking code on those non-HubSpot pages to start collecting analytics. It’s as simple as copying and pasting a line of code to the HTML of each non-HubSpot page, as you’ll see in the article below.
2. Connect your social media accounts.
Putting all your networks in one place makes what we call “social planning” a breeze. Instead of logging in to each and every social network you use to post and interact with followers, you can access all those features from HubSpot’s “Social” tab.
3. Exclude all your internal IP addresses.
You want to know how many visitors you have coming to your website, but you don’t want your own visits to count toward your reporting. To get the most accurate data possible, you essentially need to “block” visits from you and your team by excluding your IP addresses. You can get your IP addresses by performing a Google search on each computer you and your company use to access or check your company website. Just type, "What is my IP address?" into the Google search bar.
If you have a large company, your IT department may provide a static IP address or an IP range, and these are perfect, too.
4. Import existing leads.
If you have existing leads you want to transfer into HubSpot, it’s easiest to enter all the data you track into a spreadsheet—name, contact information, company information, budget, etc.—and import that data into HubSpot. As you enter data in the spreadsheet, make sure the title of each column matches the field names in HubSpot—ie: Email vs. Email Address; Website URL vs. Website; Phone Number vs. Phone.

If titles in your spreadsheet don’t match the names of HubSpot’s fields exactly, HubSpot will ask you to confirm if “Phone” is “Phone Number,” if “Email Address” is “Email,” etc., before importing the data.
5. Integrate your customer relationship management (CRM).
HubSpot offers a CRM you can use, but if you use a different one, you’ll want to connect the two so they “talk” to each other. We recommend using Zapier to connect your CRM to HubSpot. If your CRM has an API connector, Zapier can be the “bridge” between your CRM and HubSpot, syncing data between them.
6. Create folder/file organizational system.
Having a systematic way to name each file and folder you create in HubSpot makes finding your resources simple. It may take a little time to come up with a good plan, but maintaining consistency with your file names keeps you from wasting time scrolling through endless files in search of just one.
7. Set up buyer personas and buyer persona assignment workflows.
For clients who don’t already have buyer personas, we’ll identify the type of person/people they typically do business with, spend time researching them, and create a short biography for each persona. Check out our detailed process here.
Once you’ve created your personas, you need a buyer persona workflow so you can assign your contacts to a specific persona. These workflows are sets of criteria—characteristics or actions—that tell you and HubSpot which personas your leads should be assigned to. For example, let’s say a characteristic unique to your buyer persona, Medical Mike, is that he’s in the medical industry. One criterion could be that any contact who indicates on a form that they’re in the medical industry should be assigned the Medical Mike persona. Other criteria could also be the act of downloading specific white papers, or simply having a specific role in their company.
- How To Create Personas
- How To Assign Personas To Your Contacts (scroll to the third option and click “HubSpot Workflows”)
8. Build and optimize email templates.
You want the emails you send from HubSpot to look similar to the ones you currently send your clients and leads, so build a template in HubSpot that replicates those. This could be a styled template used for monthly newsletters, or just a very simple, unbranded template to be used for workflow and follow-up emails. As you create them, HubSpot will “suggest” different things you can do to your emails to increase their effectiveness.
9. Build and optimize landing page templates.
Landing pages are distinct pages on your site that inform readers about specific pieces of content and collect important data from visitors. To create an optimized landing page—one designed to convert well—follow these basic principles
- Keep your copy simple and straightforward yet enticing. You want your readers to quickly understand why they need this content you’re offering.
- Keep page navigation to a minimum. The goal is for readers to stay on your landing page and submit the form to download your content. Navigation that leads to other pages can be distracting and may cause them to leave your landing page—causing you to miss a conversion opportunity.
- Keep form fields to an appropriate limit. If the landing page is offering a top-of-funnel, basic white paper, your form should request some basic information from visitors wanting to download. The more valuable your content is, the more information it’s appropriate to request.
10. Point HubSpot pages to a subdomain of your website.
Professional and Enterprise HubSpot customers have the option of moving their website to be hosted on HubSpot or continuing to host it externally with servers like GoDaddy, HostGator, etc. If you’re not going to host your entire website on HubSpot, you’ll need to “point” any blog pages or landing pages you create to a subdomain of your website.
When you create blog and landing pages in HubSpot, they are assigned a URL like this:
http://companyname-1234567.hs-sites.com/sample-offer
That means your blog and landing pages sit on a subdomain on a website called “hs-sites.com.” If you don’t make any changes to these pages, your website won’t be credited for any page visits, keyword rankings, etc. Instead, hs-sites.com will get the credit. So, you want to create a subdomain of your website and direct all your HubSpot pages to that subdomain. Some examples of subdomains are:
info.companyname.com/sample-offer
blog.companyname.com/article-title
Doing this ensures that your site gets credit for page visits, keyword rankings, etc.
11. Create custom fields if needed.
HubSpot has default fields available to include in your website forms, but if there are other specific things you’d like to know, you can create a custom field for that information. Some examples are:
- What do you hope to accomplish with your online marketing?
- What are your biggest online marketing challenges?
12. Set up top-of-funnel (TOF), middle-of-funnel (MOF), and bottom-of-funnel (BOF) forms.
Having forms ready from the start makes creating landing pages a breeze. When we create these forms, these are the fields we typically input:
- TOF forms: first name, last name, and email address.
- MOF forms: the three previous fields, plus something additional the client would want to know about a visitor, such as a phone number.
- BOF forms: the four previous fields, plus another field or two giving the client additional information about a bottom-of-funnel lead—possibly job title, location, or information about why they are interested in the product or service.
13. Replace your existing website forms with HubSpot forms.
There are lots of different ways you can set up forms on your website, so the exact instructions for this step will vary case by case. For the most part, you’re simply replacing your existing forms with the embed code of a HubSpot form.
HubSpot’s forms are basic, but they’re clean-looking and work with many backgrounds, colors, and themes. If you like the look of HubSpot’s forms “out of the box,” you can easily insert the embed codes yourself to replace your existing forms. But, if you want your new HubSpot forms styled specifically to match the feel of your website, you’ll probably need the help of a web developer to get the exact look you want. Once they’re styled to your liking, just insert the forms’ embed codes to replace your current forms.
14. Set up smart forms with email notifications.
Smart forms are neat because they adapt to fit the screen size of the visitor’s device (like condensing the form for a mobile screen, for example). You can also add smart fields to your forms which track the information contacts submit, and pull in new fields so you get even more data about your leads. Then, just indicate who you want notified when a contact submits one of your smart forms.
15. Set up lead scoring and marketing-qualified lead (MQL) assignment workflows.
Lead scoring is the act of assigning “points” to each contact based on their activities and behaviors. Contacts increase their “score” as they move down the buyer funnel—from a prospect to a lead, to an MQL, to a sales qualified lead (SQL), and whatever final stages you have in your buyer funnel. Once a contact reaches a certain score, HubSpot will notify you that your lead is ready to be passed on to sales. Here’s our lead scoring process for more information.
Once lead scoring is in place, you also want to determine what specific characteristics or actions qualify someone as an MQL. Determining these allows you to create an MQL assignment workflow, which is exactly like the buyer persona assignment workflow mentioned above—an easy way to assign contacts to this specific stage of your buyer funnel.
- How To Use Manual Lead Scoring To Automate Your Lead Qualification
- How To Use Lifecycle Stages (choose “Adding lifecycle stages to Contacts” from the list of options)
When your lead data and resources for inbound marketing campaigns are ready from the start, you’ll see successful results faster than you would by adding these things as you go. Follow our steps for easy onboarding, and feel free to reach out if you have any questions about reaching peak efficiency.
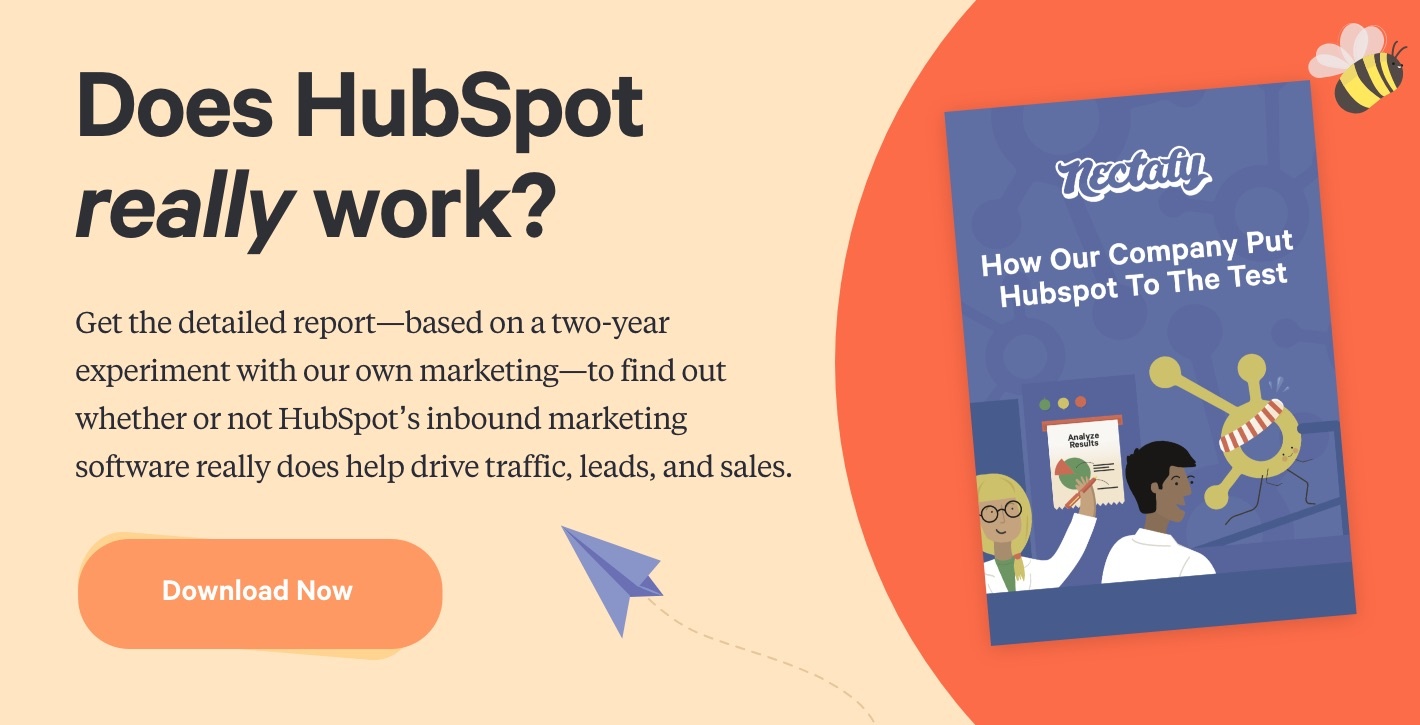
Download Now: How Our Company Put HubSpot To The Test
Chapter 2: A HubSpot File-Naming System To Keep You Perfectly Organized

When you’re trying to complete a project, the last thing you need is to spend a ton of time looking for files. Not only does it waste time, but it’s super stressful sorting and scrolling through a bunch of folders in pursuit of just one file in particular.
We found ourselves in this situation with our HubSpot files, so we created a file-naming system to get things organized. And it’s so simple, you can replicate it for your company’s files, too!
Our HubSpot File-Naming System For Effortless Organization
Landing Pages
When naming a landing page for an offer, we begin with “LP:” and finish with the title of the offer. For example:
- LP: How Nectafying Your Content Creates Powerful Inbound Marketing Material
For other landing pages we create, we name them to the point for easy searchability, like:
- LP: Contact Us
- LP: Free Trial
- LP: Demo Request
Thank You Pages
Thank you pages are almost always tied to a landing page, so using the title from the landing page keeps these pages organized and together. Using my landing page example above, here’s how we would title that particular thank you page:
- TY: How Nectafying Your Content Creates Powerful Inbound Marketing Material
Blog Posts
For blog posts, we simply use the title of the article:
- A HubSpot File-Naming System To Keep You Perfectly Organized
Emails
If you’re like us, you send out several kinds of emails. The naming scheme below helps keep all our emails in order.
Blog Post Emails
We send out an email every time we post a new article to our blog. To name these emails, we simply use the phrase “Blog email:” and paste the email’s subject line at the end. For example:
- Blog email: Find your HubSpot files in a snap
Workflow Emails
For workflow emails, we give all the emails in the series the same name and include what number in the series that email is. For example:
- Nectafy Inbound Campaign 1
- Nectafy Inbound Campaign 2
Follow-Up Emails
Follow-up emails are often sent after a contact has downloaded an offer or visited a specific landing page. So, we begin any follow-up email with “Follow-Up:” and finish with the name of the offer or the landing page it’s associated with.
- Follow-Up: How Nectafying Your Content Creates Powerful Inbound Marketing Material
- Follow-Up: Demo Request
All Other Emails
For any other emails we send out, we name them to the point so it’s easy to find them.
Workflows
We found that most of our workflows fit under three categories: Persona, Assign Persona, and Funnel. We use those as a kind of prefix for our workflow titles.
Persona & Assign Persona Workflows
Here, we begin the title with the type of workflow and end it with the name of the persona:
- Persona: Marketing Molly
- Assign Persona: Assign Marketing Molly
Funnel Workflow
For these workflow emails, we begin with the funnel stage the workflow corresponds to, then finish with the name of the offer or title of the corresponding landing page.
- TOF: The Beginner’s Guide To Inbound Marketing
- MOF: Website Redesign Proposal
- BOF: Demo Request
All Other Workflows
For other workflows that don’t fit under these categories, we name them to the point to find them easily.
Calls-To-Action
If you’re like us, you create different kinds of calls-to-action (CTAs). To make it simple to find what we’re looking for, we label each CTA by its type. (We have in-post, bottom-of-blog-post, newsletter, and thank-you-page CTAs.)
In-Post CTAs
- In-Post: 11 Ways To Survive The Crush Of Creating Content
Bottom-Of-Blog-Post CTAs
- Post Bottom: Our Battle Tested, All-Inclusive Inbound Marketing Workbook
Newsletter CTAs
- Newsletter: How Our Company Put HubSpot To The Test
Thank-You-Page CTAs
For CTAs going on our thank you pages, we begin with “TY:” and end with the corresponding offer or landing page title.
- TY: 15 Critical Steps To Keep Your Website Redesign From Going Off The Rails
If you think this looks awfully similar to the regular thank you landing page naming scheme, you’re right—it is! But, since HubSpot has a separate tab for landing page and CTA content, your files will be stored in separate locations.
Buttons (Download, Contact Us, Etc.)
We consider our buttons CTAs since they’re asking the user to perform a specific action. Each button’s title begins with the action described on the button and ends with the name of the offer or the title of the corresponding landing page.
- Download: Sample Inbound Marketing Proposal
Sometimes, the only difference between some CTAs is their color. So, if we have multiple copies of the same CTA and the only difference between them is their color (i.e., they all point to the same URL), we simply add the CTA’s color in parentheses at the end of the title.
- Download: Sample Inbound Marketing Proposal (Orange)
- Post Bottom: How Our Company Put HubSpot To The Test (Blue)
What A Perfect HubSpot File-Naming System Boils Down To
Our naming system is perfect for us. But if it’s not quite perfect for you, don’t fret—you too can create something unique that will help your company stay organized. The most critical part of any naming system is consistency. Whatever you decide to use, make sure all your team members know about it and commit to follow it. Then you’ll never have a problem finding any of your HubSpot files again!
Chapter 3: Our 5 Most Helpful (& Most Used) HubSpot Integrations

If you follow our blog, you know we often share about the experiences we’ve had using HubSpot (the good and the bad)—overall, it’s been great for our marketing.
But even though it is a great tool, if you’re like us, you also use a lot of apps and software outside of HubSpot. Luckily, there are tons of great HubSpot integrations that connect these apps and programs to HubSpot, making HubSpot an even more powerful tool.
Below are four of our favorite HubSpot integrations and a brief explanation of what they do.
Our 4 Favorite HubSpot Integrations
1. Gravity Forms
Instead of building our website on HubSpot’s COS, we built our site and blog on WordPress. (It just made more sense for us to build there.) Gravity Forms is a WordPress add-on for Zapier—an integration that allows you to “send” information from one program/software to another. (See #5.) We like Gravity Forms for two reasons:
- It allows us to create and edit forms on our WordPress site, which then automatically update directly in HubSpot.
- Any user data we collect on our WordPress site is automatically transferred to our HubSpot database.
2. Salesforce Integration
If your business uses Salesforce, you’re in luck—HubSpot created a custom integration for it. Once you set it up, it syncs any data you want to and from each program so your sales team has all the information they need about leads.
Drawback: While this integration does work well, some of our clients have had challenges with the sync function suspending. We’ve found that how well the integration works is dependent on what Salesforce plan you have and how many fields you want to sync between it and HubSpot. During syncing, it makes a lot of API calls, and depending on your Salesforce plan, you may have a limited number of API calls to work with.
3. SurveyMonkey
With this HubSpot integration, you can create and send surveys through SurveyMonkey. When a person completes a survey, SurveyMonkey transfers the results directly into HubSpot’s contact record for that person.
Drawback: The integration can’t change the contact’s properties based on a survey result, but it does insert their results in the contact’s timeline so you can make the appropriate updates.
4. Zapier
If you use a program, app, or software that doesn’t already have a HubSpot integration, Zapier is an amazing solution (so long as whatever you’re using has some kind of API connector). Zapier is the “bridge” that connects two programs, and it works really well with HubSpot. For example, if you use a CRM other than HubSpot’s, you might use Zapier to connect your CRM to HubSpot and pass qualified leads to your sales team.
What HubSpot integrations have you found most helpful and useful? Let us know over on Twitter—@nectafy!
Chapter 4: Avoid A Marketing Snafu By Conducting A HubSpot Audit

I know, I know—the word “audit” can be a little scary. Personally, I think of numbers, spreadsheets, and a serious headache when I see or hear the word (and then immediately run in the opposite direction). But don’t let it intimidate you, because I’m here to talk about a completely different kind of audit—one that is crucial to your inbound success.
If you use HubSpot to carry out your inbound marketing efforts (or even if you don’t), you know that there are a lot of pieces that must all fit together perfectly in order to effectively execute your inbound strategy. And if just one component is broken, that could be all it takes for a warm lead to go completely cold.
This is why once a month we perform a “HubSpot audit” for Nectafy, and we make this service available to all of our clients as well. We go through each and every live landing and thank you page, all follow-up emails, and workflows and their associated emails.
All of these items make up the heart and soul of inbound and every month we want to make sure our leads (and our clients’ leads) are having the best possible experience when they download an offer, receive an email, or are enrolled in a workflow. (This means checking to see that everything is rendering as it should without any errors.)
So, because we’re big on sharing here at Nectafy, we wanted to pass along our process for conducting a HubSpot audit, so that you too can have all the pieces of your inbound puzzle running flawlessly.
Landing Pages
In HubSpot, navigate to Content > Landing Pages.
- Select Published from the drop-down menu.
- View each landing page live (More > View)
- Click through all URLs, including calls-to-action (CTAs), to make sure there are no broken links.
- Fill out any forms to make sure they submit properly.
- Confirm thank you page or in-line thank you message appears as it should.
Blog Posts
In HubSpot, navigate to Content > Blog. Note: If your blog is hosted elsewhere, like WordPress, navigate to that portal.
- Select Published from the left-hand side.
- View each article live (select drop-down arrow, then View).
- Click through all URLs (including CTAs) to make sure there are no broken links.
- Scan for any odd formatting, errors, etc.
Tip: You likely have a ton of articles, so we recommend performing a random check of 10-15 blog posts, and selecting different ones to audit each month.
Emails
In HubSpot, navigate to Content > Email.
- Sort by Follow-up.
- Preview each email (select drop-down arrow, then Preview).
- Click through all URLs (including any CTAs) to make sure there are no broken links.
- Scan for any odd formatting, errors, etc.
Workflows
In HubSpot, navigate to Contacts > Workflows.
- Sort by Active Workflows.
- Click through each workflow and:
- Confirm there are no error alerts.
- If there are automated emails sent in the workflow, click through each email to confirm that all links are functioning, there are no formatting errors, etc.
Not a HubSpot user?
The great thing about our audit process is that it can be implemented on any platform, even if you’re not a HubSpot user (you can read more about our experience with HubSpot here). The exact steps may vary, but the overall method of reviewing landing pages, blog posts, emails, and workflows is imperative, regardless of the platform you use.
Conducting a HubSpot audit will probably be the most painless audit you will ever perform. Not to mention, it’s an easy way to keep your leads warm and coming back for more.
Do you regularly perform audits of your inbound content? Let me know in the comment section or tweet us @nectafy—I’d love to hear what tips you have!
Chapter 5: How To Use HubSpot Lists For Deeper Analytics

I love lists. I make them for everything—grocery shopping lists, to-do lists, packing lists, lists to keep track of the books I want to read and ideas for my upcoming wedding—you name it, and I likely have a list for it.
Typically, these lists are handwritten. There’s just something about putting pen to paper and detailing out what needs to get accomplished that makes it more enjoyable (not to mention the tremendous amount of satisfaction I get when I’m able to cross off an item once it’s complete!). Even with advanced technology and all of the endless (and I’ll admit, cool) ways that I could be making lists right from my computer or phone, I still prefer the old fashioned kind. Except when it comes to HubSpot lists.
What Are HubSpot Lists?
As you already know by now, we use HubSpot for not only our own inbound marketing efforts but for our clients’ as well. And one of the features of the software is the ability to create lists—an incredibly important part of marketing.
HubSpot allows you to funnel your contacts into lists based on certain properties and traits. This is useful when emailing or setting up workflows so you’re able to send (or not send) to the contacts you want.
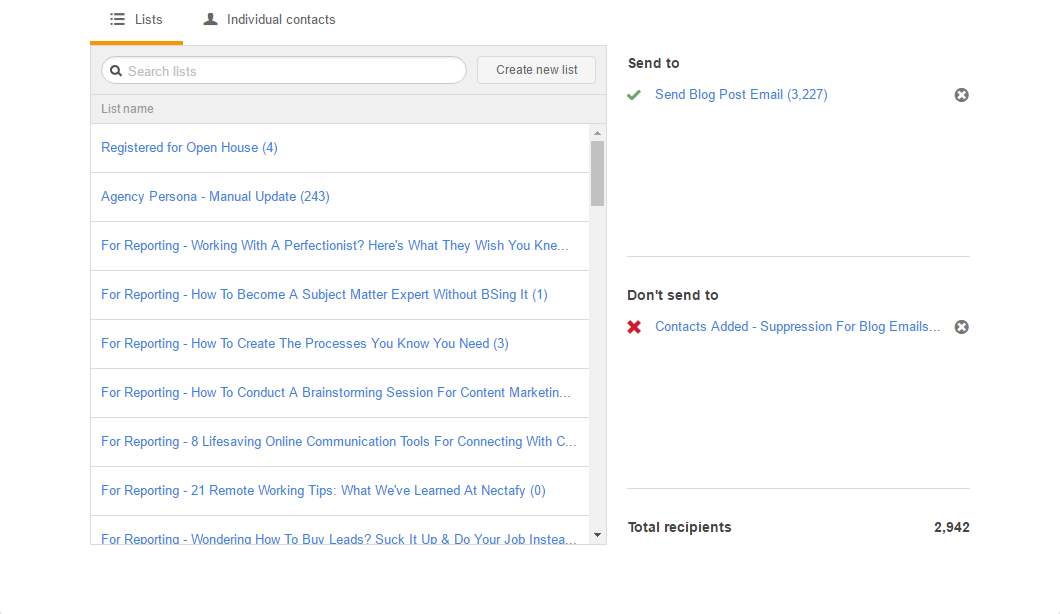
As you can see in the example above, we have a list for all of the contacts who have subscribed to our blog and a list of contacts who are qualified leads or customers so we can exclude them from any marketing emails. (You can learn more about setting up these basic lists here.)
While these are obvious ways to utilize HubSpot lists, there is actually a lot more you can do than just organize and email your contacts.
Using HubSpot Lists For Reporting
HubSpot’s reporting features allow you to glean basic insights on visits, leads, and customers by source as well as keyword and page performance reports. This information is helpful when looking at the big picture, but when it comes time to dive into more in-depth analytics, you won’t find a report for that. Unless you want to spend an extra $200 per month on HubSpot’s “Reporting Add-On."
What you can do, though, is pocket that extra $2,400 a year and get a similar wealth of detailed analytics utilizing HubSpot lists. Check out some of the ways we’ve been able to use lists for advanced reporting.
Reporting Leads Generated By Blog Posts
Blog Optimization Leads
Every month, we implement a blog “optimization” for some of our clients, which is typically a small tweak in the way we are currently doings things with the goal of increasing leads and conversion rate. This may be adding an H3 CTA to the body of an article, swapping out a designed CTA for a more relevant offer, or giving the blog post a “refresh” by adding in new content.
Once this optimization has been made, we then set up a list that looks like this:

Here are the steps we follow:
- Select a period of time before you made the blog optimization. Example: 4/01/2016–6/10/2016.
- Go to “Page Performance” in HubSpot, and report on the number of page views for the time period you’ve chosen. Divide page views by blog contacts to get the page’s conversion rate.
- Back in lists, select a period of time after you made the blog optimization. Example: 6/11/2016–9/20/2016. Divide page views by blog contacts to get the page’s conversion rate.
By first running the list before the blog optimization was made, we’re able to see how many contacts came directly to the blog. Once the conversion rate of the blog post is determined, we’ll update the list’s Create Date to after the optimization was made (using the same duration of time for accurate reporting). Once we have both conversion rates, we’ll compare the two. If the conversion rate is higher post-optimization, then we know we were successful.
General Blog Leads
You also likely spend a lot of time curating content for your blog, but how do you know if it’s generating leads for your company? You guessed it—with another HubSpot list! Find out how many leads originated from your blog each month with a simple list like this:
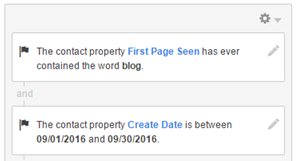
We define a lead coming from a blog post as “First Page Seen,” but note that this starting condition will only work if your blog posts include “blog” in the URL.
Identifying & Reporting Inactive Leads
If you’re a HubSpot user, you’re probably all too familiar with its pricing model and how the cost is tied to the number of contacts you have in the portal. Over time these contacts can really start to add up, many of them being dead leads, so it’s important to be able to get a better idea of who these contacts are.
The list criteria will vary depending on the nature of your business and what you deem an “inactive” or “disengaged” contact, so we recommend you decide on a definition that is specific to your company and industry.
Here’s an example of a list condition we’ve used for clients (and Nectafy):
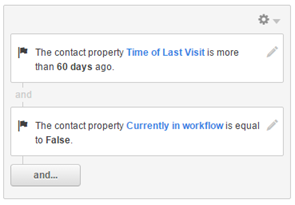
Whether you attempt to re-engage these leads with an email campaign or purge them altogether is up to you, but this will give you a much better picture of the number of disengaged contacts you have in your portal and when they last visited or interacted with your site.
Organizing Leads By Persona And/Or Lead Score
It’s important to have a solid understanding of who your leads are, and we recommend reporting on this monthly using one of the following methods.
Buyer Persona
You’ve spent time identifying your buyer personas, but now what? While HubSpot does show leads by persona on your dashboard, they’re only displayed as a percentage of your total contacts, not by month.
By creating a separate list for each of your organization’s personas, you’ll be able to determine how many contacts that month were attributed to each.
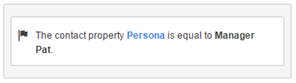
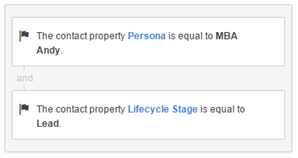
If you’ve been dedicating your inbound efforts to blogging and writing offers geared toward CEO Charlie, but your monthly buyer persona list shows that the majority of your company’s leads are Manager Pat, you’ll know that it’s time to reevaluate your strategy.
You can also take this a step further by adding the condition that the contact property Lifecycle Stage is equal to Lead, MQL, or Customer to further analyze your contacts’ personas, as seen in the example below.
Lead Score
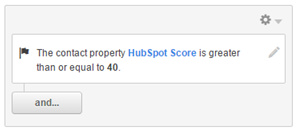
Lead scoring is a feature that allows you to assign points to your leads based on their activities and behaviors. It helps you determine which leads should be prioritized and moved along to sales.
Once you have your lead scoring set up (learn more about how to establish a lead scoring process here), you’ll want to keep an eye on the contacts that have a lead score less than or greater than or equal to the lead score that you’ve concluded suggests a warm or qualified lead. These lists may look like this:
Example 1
Example 2

Checking this list periodically will help you determine when it may be time to send a nurture email campaign to less engaged contacts versus who is active on your website and should be prioritized as a lead.
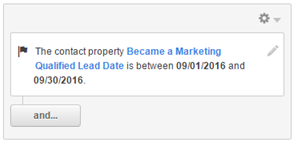
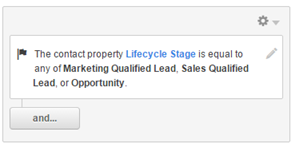
Determining Marketing Qualified Leads (MQLs)
For some (unknown) reason, HubSpot’s basic source reporting doesn’t include an option to view your MQLs for a specified timeframe, which is where a HubSpot list comes in. Use these lists to report monthly and gather better key insights:
Example 1
Example 2
You can learn a lot from MQL reporting, such as the lead’s first referring site, their recent conversion, their original source (organic search, paid, social, direct traffic, etc.) and more by exporting these properties from the list. In fact, we send one of our clients a weekly MQL report so they can compare week-over-week where around the world all of their MQLs are coming from, which offers are converting the most leads, how those contacts got to their website, and more.
Reporting On Free Trials By Month
Does your company offer a free trial? If so, you can dive into more detailed analytics (such as how many people per month are requesting a trial, if there is a trend in the region of the country/world contacts are coming from, how long they spend on your site before requesting a trial, etc.) by creating a list and then exporting your selected properties.
Don’t Forget To Stay Organized
HubSpot lists are a great way to dive deeper into some pretty useful analytics, but if you aren’t careful with how you name them, you’ll quickly become confused as to which lists are what.
Make sure each list has a specific and clear name so you can quickly navigate to that list when needed. And be as detailed as possible so your reporting continues to be a breeze—not an added headache.
How Do You Use Lists?
I’d love to hear how you use HubSpot lists (or any list for that matter!) for your company’s detailed reporting. Let me know by sending us a tweet—@nectafy!
Chapter 6: How To Manage Multiple Websites In HubSpot (Without Going Crazy)

There’s a reason we’re taught from a young age to separate our whites from our reds when we’re doing laundry—some things are just meant to be done independently. It can make life easier and much more efficient (hello, no more white-turned-pink clothes!).
Well, it turns out that HubSpot doesn’t necessarily share this same view when it comes to trying to manage two websites within its platform. If you have a standalone product or brand, or perhaps two very different audiences, you may have more than one website. But the only two options HubSpot makes available to users are the Professional account, which results in a completely separate portal for each of your websites, or the Enterprise account, which is a single portal for all of your websites.
Because the Professional account only supports one domain, this means that if you have three different websites you would like to manage in HubSpot, you'll need three completely separate Professional accounts. This is certainly effective for reporting, since you'll be able to gather data for each domain independently, but it doesn’t come without its downsides. You'll have to pay for three separate accounts, you'll be jumping around from one portal to the other every time you want to do or check something for a different domain, and you won't be able to see the data across all of your domains in one place.
If you have more than two websites and 10,000 contacts to manage, you will likely find that the Enterprise account may be the more cost-effective approach. But the downside to this account type is that you won't be able to gather a deeper understanding of each site's performance, since you can't separate one domain out from the other when it comes to reporting. (You can read more about the features of each account type here.)
If you go the HubSpot Enterprise route, you’ll need a strategy right from the very beginning in order to manually organize how you’re going to manage your two different sites within the same portal, since HubSpot makes it pretty much impossible to separate the two out from one another. And keep in mind that the longer you wait to devise a plan, the more confusing your portal is going to become.
Lucky for you, we recently created a HubSpot management plan for one of our clients trying to juggle two separate sites within the portal, and we’re sharing our exact strategy with you.
How To Manage Multiple Websites In HubSpot (Without Going Crazy)
Leads, keywords, reporting… before we can even dive into figuring out how to manage each of these, we’ll need to first start with a universal naming scheme that everyone at the company can adhere to.
Naming Scheme
For each HubSpot tool, you will need to follow a naming scheme in order to easily differentiate between your two sites. This should apply to the following:
- Campaigns
- CTAs
- Design Templates
- Emails
- Forms
- Landing Pages
- Lists
- Workflows
The naming rules for each should be as follows:
“Domain - Stage Of Funnel: Title/Name”
For landing pages, there is one addition—the type of landing page. Here are a couple examples:
- nectafy.com - MOF - LP: 30 Insider Tips For Getting Fast Results From HubSpot
- nectafy.com - MOF - TY: 30 Insider Tips For Getting Fast Results From HubSpot
(“LP” stands for “landing page” and “TY” stands for “thank you” page.)
Note that it’s important to list the domain first when naming items in HubSpot, as it will allow you to sort or search by domain quickly.
Leads
Separating out leads is one of the most important reasons for implementing this HubSpot management system. Surely you’re going to want to know which leads are attributed to which website, and this process will make that doable.
Assignments
Follow this process to assign each contact to a particular domain.
- Create a new contact property (HubSpot > Contacts > Contact Settings > Create New Property): “Domain.”
- Radio Select Options:
- Domain Name #1
- Domain Name #2
- Create a new workflow and set up the following rules utilizing an if/then branch:
- First Page Seen = DOMAIN #1 Or
- Contact Has Filled Out Any DOMAIN #1 Form
If YES:
- Mark “Domain” as DOMAIN #1.
If NO:
- Mark “Domain” as DOMAIN #2.
Organization
Keep yourself organized by having two sets of lists for each “Domain.” The suggested list titles and conditions are outlined below.
Domain #1:
- Domain #1 - Leads
- Contact Property Domain = DOMAIN #1 AND
- Contact Property Lifecycle Stage = Lead AND
- Create Date Is Between [Month You’re Reporting On]
- Domain #1 - MQLs
- Contact Property Domain = DOMAIN #1 AND
- Contact Property Lifecycle Stage = MQL AND
- Contact Property Became An MQL Date Is Between [Month You’re Reporting On]
- Domain #1 - SQLs
- Contact Property Domain = DOMAIN #1 AND
- Contact Property Lifecycle Stage = SQL AND
- Contact Property Became An SQL Date Is Between [Month You’re Reporting On]
- Domain #1 - Opportunities
- Contact Property Domain = DOMAIN #1 AND
- Contact Property Lifecycle Stage = Opportunity AND
- Contact Property Became An Opportunity Date Is Between [Month You’re Reporting On]
- Domain #1 - Customers
- Contact Property Domain = DOMAIN #1 AND
- Contact Property Lifecycle Stage = Customer AND
- Contact Property Became A Customer Date Is Between [Month You’re Reporting On]
Domain #2: Follow the same rules as above, except replace DOMAIN #1 with DOMAIN #2.
- Domain #2 - Leads
- Domain #2 - MQLs
- Domain #2 - SQLs
- Domain #2 - Opportunities
- Domain #2 - Customers
Personas
You’ll also want to create workflows that assign your personas to a specific domain by setting up these rules:
- Assign a DOMAIN #1 persona if the contact meets the job role criteria AND they have “Domain” set as DOMAIN #1.
- Assign a DOMAIN #2 persona if the contact meets the job role criteria AND they have “Domain” set as DOMAIN #2.
Reporting
Now that you’ve established a way to attribute leads to each of your domains, you’ll want to put this data to use by reporting on it.
Monthly Reporting
Without all of the above steps, reporting on monthly visits, leads, and MQLs by domain would be impossible. But now that we’ve established a way to attribute leads to each domain, we’re almost ready to put this data to use by reporting on it. The process for reporting on this criteria is outlined below (but keep in mind that if you want to dive even deeper and pull more detailed data, you may want to utilize Google Analytics as well).
Visits
Initially, we thought determining visits by domain would be a piece of cake with HubSpot’s Events tool. But after some back and forth with their support team, I quickly discovered that Events can only be used to track specific actions—such as a click on a particular page—not actions across an entire domain.
After going back to the drawing board, it turns out that the only way to separate out visits by domain is to utilize the Page Performance tool. Here’s how to do it:
- In HubSpot, navigate to Reports > Page Performance.
- Filter the results by the month you are reporting on and report on all pages.
- Export the file (located in the top, right-hand corner).
- Delete out row one and columns E-M.
- Delete out the rows at the very bottom starting with “Exported by HubSpot Reports.”
- Sort the spreadsheet by URL (A to Z).
- Delete out all rows that don’t start with the domain name you are reporting on.
- When only URLs for the domain you are reporting on are remaining, add up the total in column D for total views.
Leads
Use the list you previously created, “DOMAIN #1 - Leads,” and filter by month to determine the number of leads that came from that domain. Repeat the process for your other domain(s).
MQLs
Use the list you previously created, “DOMAIN #1 - MQLs,” and filter by month to determine the number of MQLs that came from that domain. Repeat the process for your other domain(s).
Keywords
In order to report on the effectiveness of your keywords for each domain, you’ll need to assign a campaign to each of your domain-specific keywords. For example:
- Keywords targeted for DOMAIN #1 need to be tagged with the “DOMAIN #1” campaign.
- Keywords targeted for DOMAIN #2 need to be tagged with the “DOMAIN #2” campaign.
Implementation
At the risk of sounding dramatic, this entire process will quickly become useless if you don’t have your whole team (or anyone else who helps with your company’s HubSpot management) on board. So make sure that everyone who needs to know these rules are up to date on this process and that they routinely follow these steps when working in HubSpot.
And while we may have initially patted ourselves on the backs over here at Nectafy for figuring out a “cheat” to managing two domains within a HubSpot Enterprise account, the truth of the matter is, if the software is going to allow you to run both within one portal (and charge you for it), you should be able to report on each domain separately.
Hopefully HubSpot will soon catch on that bundling everything into one portal doesn’t necessarily make life easier if we’re not able to extract valuable information based on domain. In the meantime, we’ve done the dirty work for you, and once you have the process down, reporting on two different domains will be as clean and tidy as your diligently separated light and dark laundry.
Download Now: How Our Company Put HubSpot To The Test
Chapter 7: HubSpot Hack: How To Create Alternate Form Content For Certain Visitors

An Introduction To This HubSpot Hack: Smart Content Over Forms
ClearPoint Strategy, a Nectafy client, is a software company that offers a free trial of its Balanced Scorecard software. People would frequently come to the site to fill out the free trial request form, get distracted and forget they'd done it, and then return to fill out the form again a few days later. This was making it hard for reporting because it'd be counted as two requests instead of one. Furthermore, these people would also fill out the form a bit differently the second time, which would present conflicting data.
They wanted to find a way to show people a message who have already filled out the form. We went about finding a way in HubSpot, and have included the video tutorial below.
Marketing Scenarios
If you've ever found yourself in one of these two situations, this video could be a great help:
- People frequently fill out forms more than once, and you want to stop that from happening.
- Customers want to download your content, and you don't want to annoy them by asking for contact information.
Solution
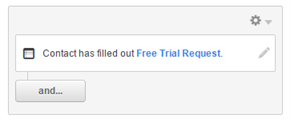
Use "Smart Content" in HubSpot in place of "Forms." Smart Content allows you to show certain content to people if they fit into one criteria, and different content if they've taken other actions on your site. For this scenario, you'd want to show a message for people who have already filled out the form (or who are customers), and you'd want to show the form to people who haven't filled it out before (or who are not customers). Here's the result.
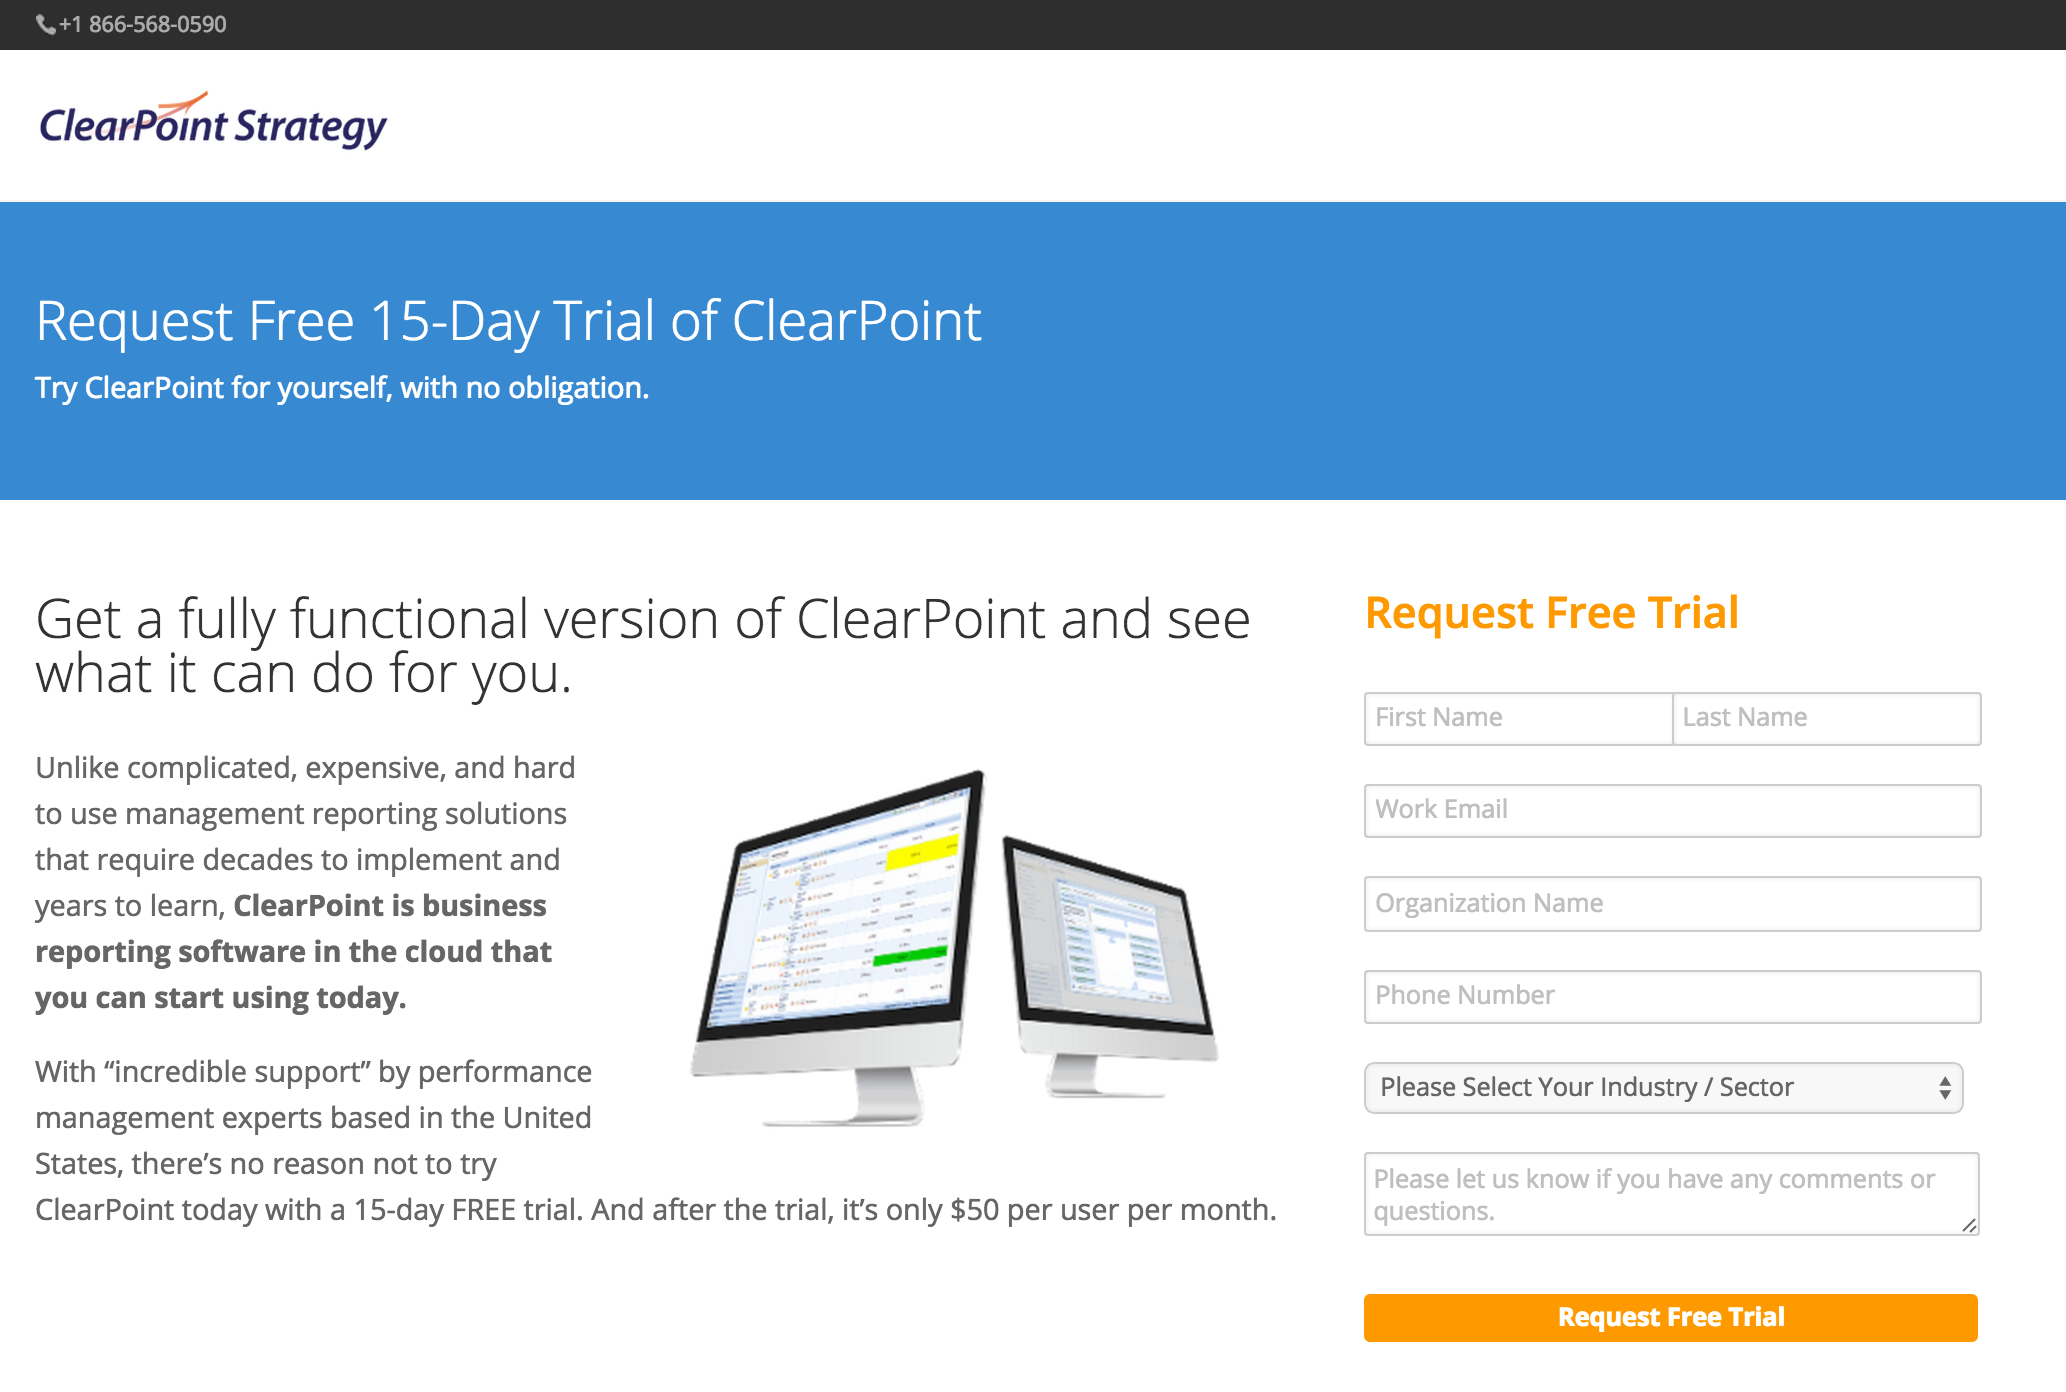
Someone who hasn't filled out the form will see this:
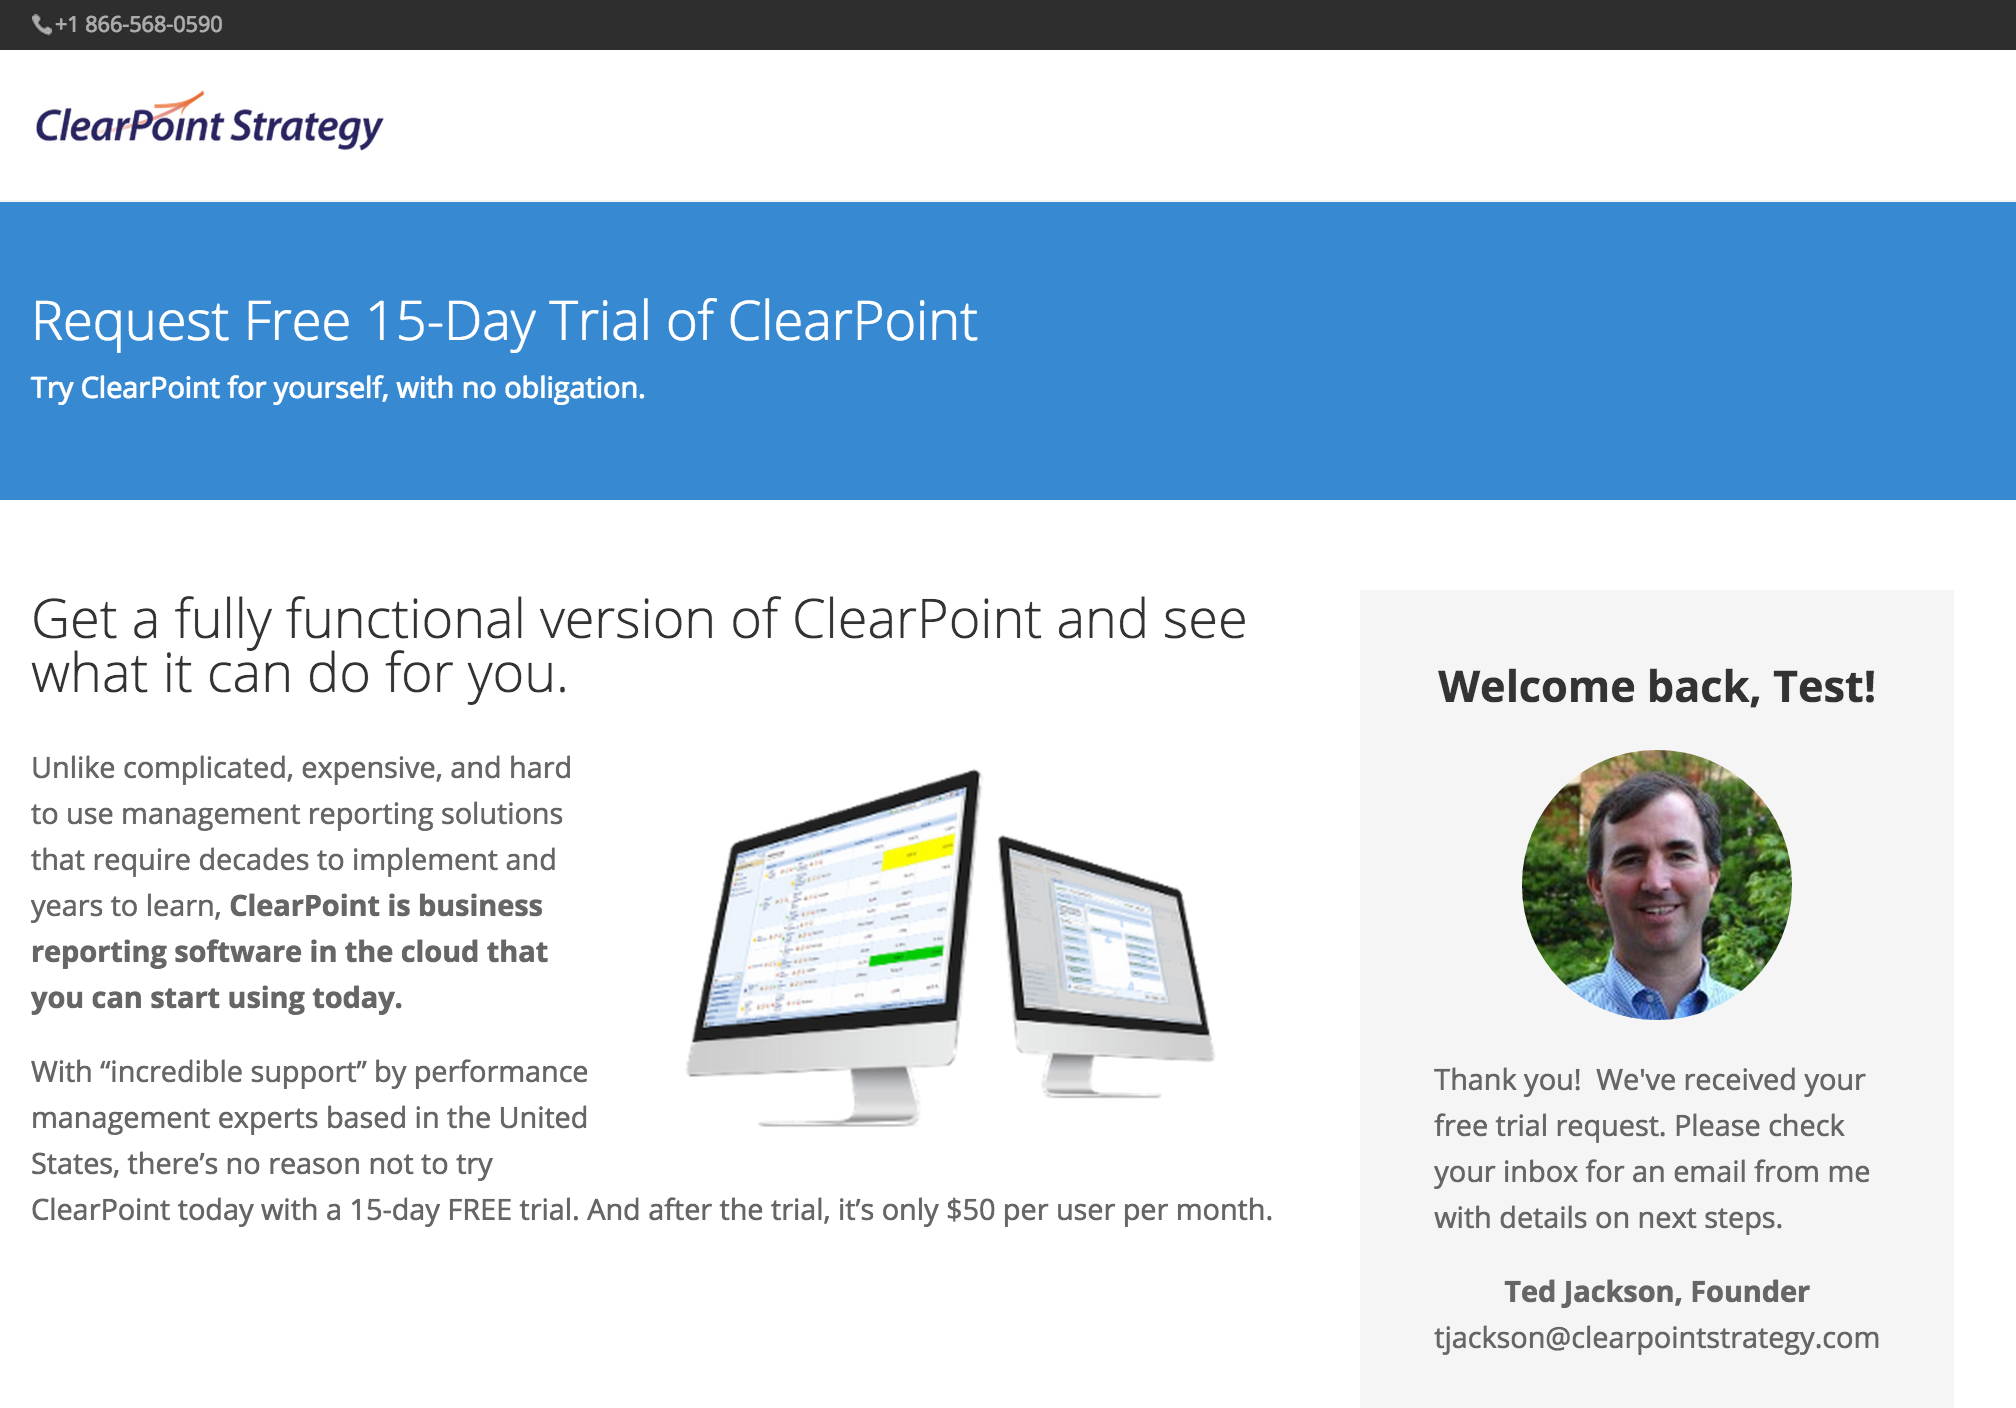
Someone who has filled out the form before will see this:
Now, if you haven't already, go check out the video above.
Did this help you? Do you have questions about how to solve a certain problem in HubSpot? We're up for the challenge. Tweet at us (@nectafy)—your idea or question could become our next HubSpot Hack!
Chapter 8: SEO & HubSpot Hack: How To Find, Attract, & Categorize Leads By Vertical [Video]
![Chapter 8: SEO & HubSpot Hack: How To Find, Attract, & Categorize Leads By Vertical [Video]](https://www.nectafy.com/hubfs/images/Blog/Chapter-8.jpg)
Check out the video below to follow along. If you’d like to see the process listed out in steps, we have that for you below the video. Today’s HubSpot Hack will help you find vertical-specific keywords, rank for them, and attract and categorize leads in HubSpot. It works.
1. Multiply your main keywords with target verticals in Keyword Planner.
Google’s Keyword Planner has a helpful tool that I feel like is underutilized, but it can really help you find target keywords.

This tool allows you to enter two keyword lists, so Google can match up each combination of all phrases. This is perfect for finding vertical-specific keywords. My recommendation is to put your industry and overall keywords on one side, and put all of the verticals you sell to on the other side:
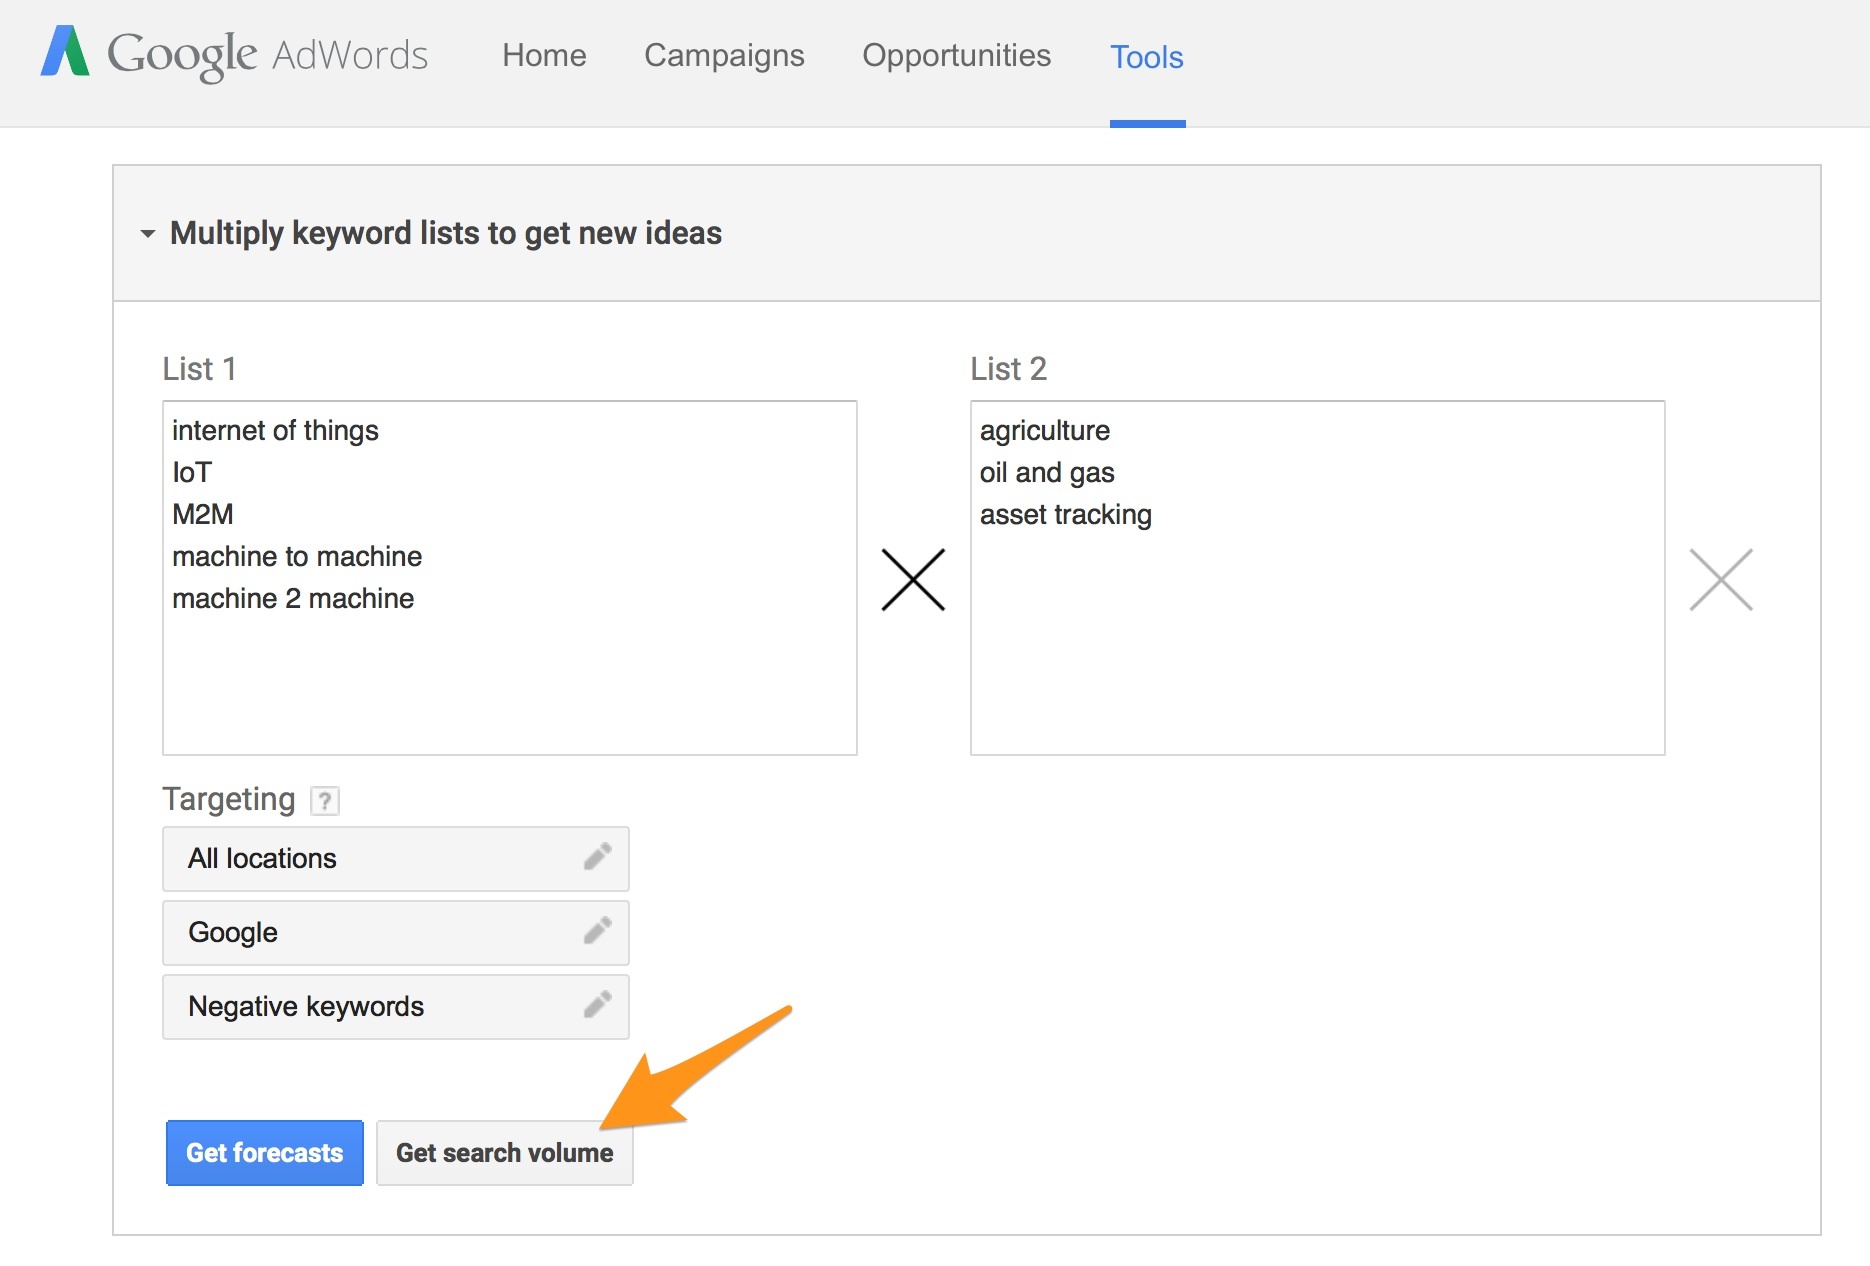
The image above is from real research we’ve done for a Nectafy client, Link Labs. They are a wireless engineering company in the Internet of Things (IoT) space, and they’ve found a handful of verticals that can benefit most from their solutions.
- We put the main keywords on the left side (these would be equivalent to terms like inbound marketing, CRM, or billing software).
- We put the verticals they sell to on the right side.
Google did the rest.
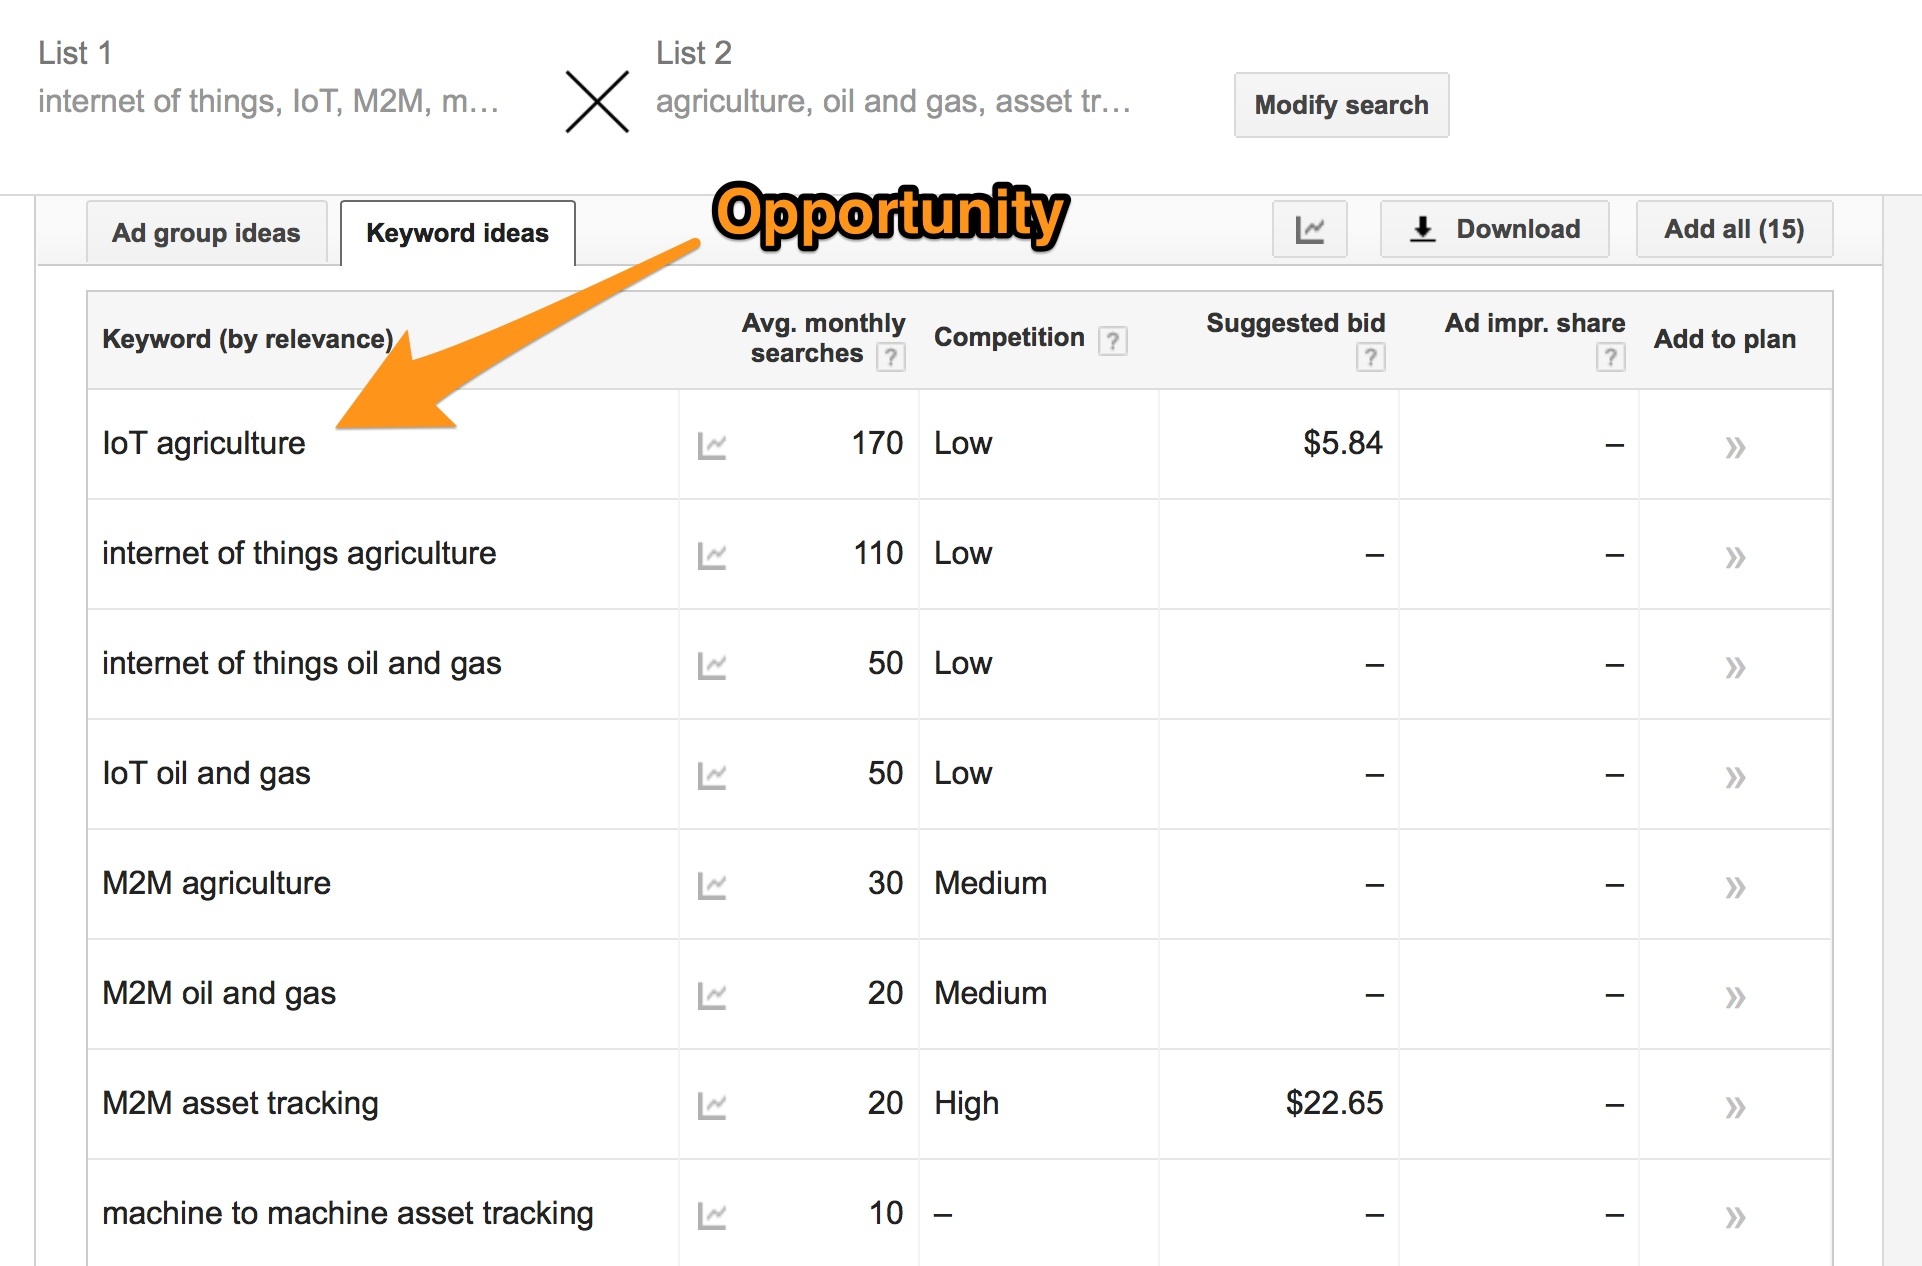
All of these are great keywords for Link Labs—a startup with a new website. The competition is low, there are groups of related terms, and there are enough monthly searches to justify us targeting these keywords. We decided to write about “IoT agriculture” first.
2. Write a blog post targeting your vertical-specific keyword groups.

3. Embed a strong and related call-to-action (CTA).
If you do end up ranking for the term you targeted, you’ll want a way to turn a portion of your readers into leads. Make sure your blog post includes a CTA that is related to the topic and interesting to the reader.
4. Track your keyword rankings.
With this blog post, we’re on the first page for 10 related search phrases. HubSpot marks all of them as “low” monthly search volume, but we know from checking Google that “iot agriculture” attracts 170 searches per month. Add up all of these terms, and we’re definitely attracting some targeted traffic in one of our main verticals.
![]()
5. Segment your new leads into their own vertical list.
Now that you’re stockpiling visitors and leads from this one blog post, it’s time to organize them neatly in HubSpot. One way to do that is by setting up a list.
- Create a new “Smart List.”
- Set the “Contact Property” to “First Page Seen.”
- Add in the URL of your blog post.
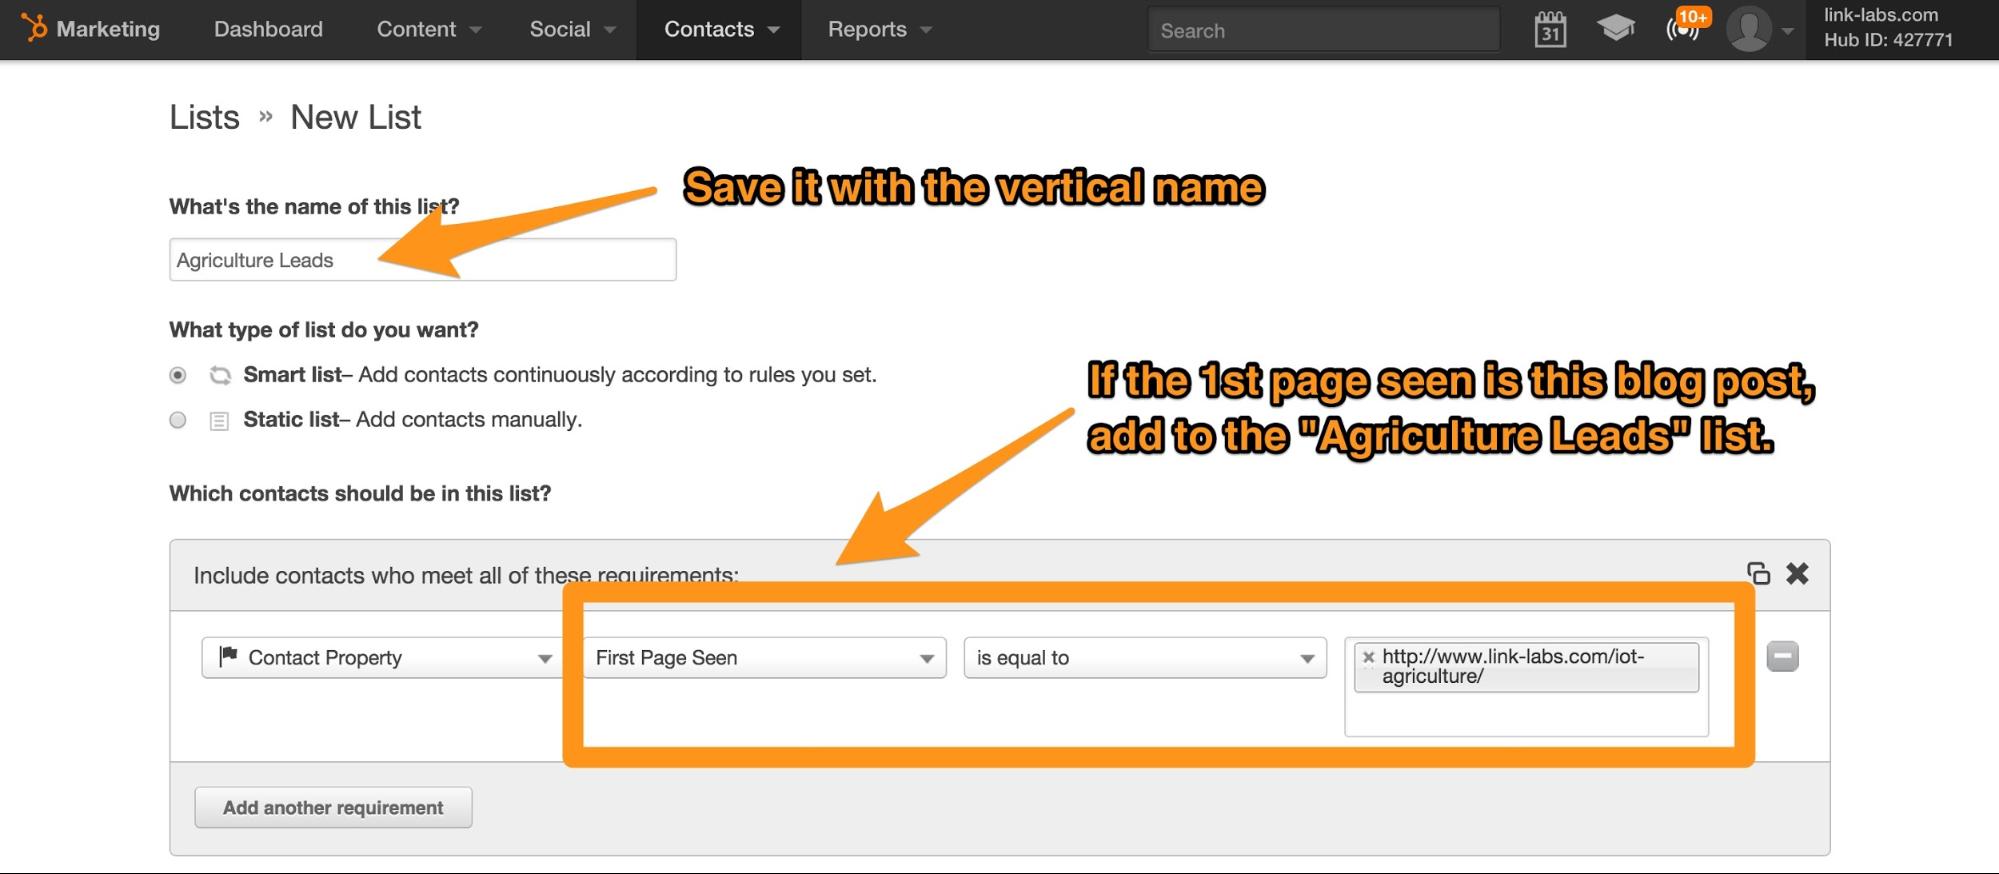
Now, you’ll automatically categorize people from that industry who find this blog post. You don’t have to ask on forms, because you can safely assume that someone searching about a solution for the agriculture space is actually in that industry.
The result of one blog article:
Want to hear how well this worked for Link Labs? In fewer than six months, this IoT agriculture blog post has:
- Received 2,345 visits,
- Generated 50 leads, and
- Captured first-page Google rankings for 23 keywords.
And the best part is that we know each lead comes from the agriculture vertical without having to ask!
So there you have it… an SEO and HubSpot hack that can really turn out some great results. Try it out, and let me know if you have any questions.
Conclusion
As you know, HubSpot is constantly making improvements and updates to the platform, which means we’ll always have new tips, hacks, and tutorials to share with you. If you want to learn more about our journey with HubSpot, we share an in-depth review of our first two years on the platform here. And as always, if you have any questions about HubSpot, or growth content in general, don’t hesitate to get in touch!